

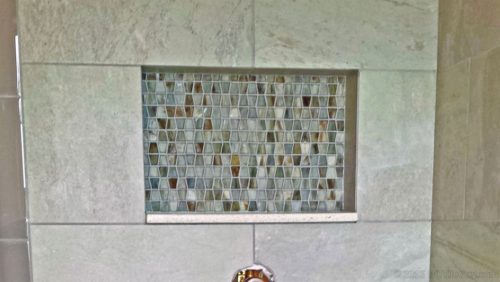
How To Install Shelf In Shower
In this post we discuss:
- How to cut an inset niche into the wall
- What tools to use to build the recessed shampoo shelf
- Blocking (framing) for a recessed niche
- How to make sure your niche is waterproof
- Tile inside and around your shower insert
Estimated reading time: 11 minutes
The Ultimate Guide to Building a Preformed Recessed Shower Niche
Part 2 Building, Installing, and Tiling a Recessed Shampoo Shelf
Enough Planning- Let's Start Building a Shampoo Niche!
This is where you are going to actually determine where to put your recessed shampoo shelf in the wall. Here's where you're at:
- The tile layout is determined
- You've started tiling
- A stud bay has been selected for the recessed shampoo shelf
- Your preformed foam niche in hand
Other niche building posts:
- Planning and Design
- Modifying a prefab niche
- Building a custom niche
Be sure to read The Ultimate Guide to Building a Preformed Recessed Shower Niche Part 1: Planning and Layout
The reason for starting the tiling is so that there is less chance of error. It allows you to make small adjustments.
For example, if you end up being 1/8 inch higher with your tile rows than what you had planned it's easy to make an adjustment to cut the box out 1/8 inch higher.
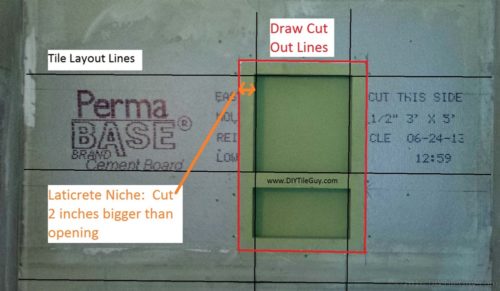
Determining Exactly Where to Cut
Here are the steps to figuring out where to cut the hole in the wall for a recessed shampoo shelf.
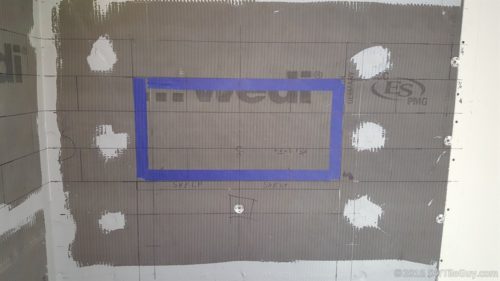
Project your tile lines around the niche
Say you were using 12×12 tile.
You'll want to draw out the tile lines around the recessed shampoo shelf so that you have a 12-inch square box drawn on the wall.
Measure the outside of your niche
This is so you can draw a box on the wall that is the size of your niche + 1/8 inch all the way around.
Each niche is different and has a different size to cut out. For example:

Noble Niche
A Noble 301 square niche is for 12-inch square niches. However, there is 1 1/8 inch of foam all the way around it.
So the outside measurement is 14 1/4 inches. It's this size so that it will fit inside a 14 1/2 inch stud bay with a little wiggle room. The stud bays do vary in size slightly and that's the reason for the 1/4 inch of play.
Hydroban Niche
A Hydroban 12×12 niche is 15 3/4 inch across. This is because it has a flange around the outside.
The edge of each flange will sit in the center of the studs on two sides.
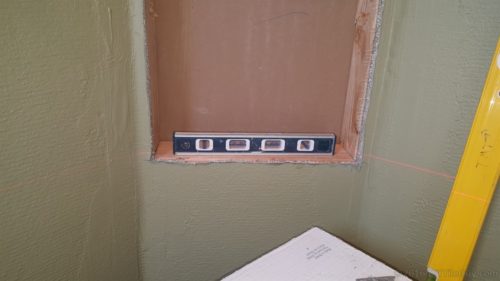
Measure from your drawn grout line and make a mark on the outside of your niche
For example: With the Noble niche you would measure 1 1/4 inch and make a mark on the wall. The reason it's 1 1/4 is that you want to have an additional 1/8 inch around for a gap. Do this on all four sides.
For the Hydroban niche, you would measure 2 inches and make a mark on the wall. Again this will allow for an additional 1/8 inch gap to surround the niche. See drawing below:
Place the foam niche on the wall backward
Then line it up in between your marks on all four sides. Make sure it's level across. Take a pen or pencil and draw around the niche.
That's where you are going to cut.
Cutting the hole
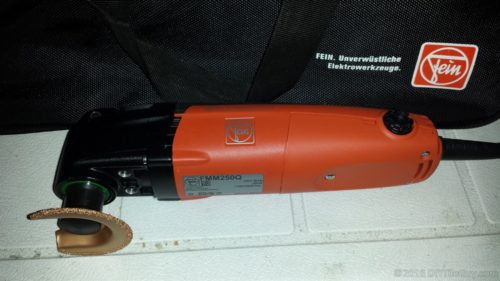
The way to cut out the hole in the wall will depend on what kind of tile backer board you've installed.
If you've installed a foam board like Wedi or Kerdi-board then you can make the cutout with a razor knife if you like.
If you've installed cement board or a fiber cement board, such as Hardibacker, then you're going to have to use something different.
TIP: Before cutting always review your photos and make sure there are no pipes and wires that you may cut into.
What I recommend is using an oscillating multi-tool such as the Fein Multimaster. One of the carbide-tipped blades will work well on cement boards.
The reason I recommend this is because it is much less dusty than other power tool alternatives.
A 4-inch grinder with a diamond blade will make a cleaner cut but creates an immense amount of fine airborne dust. If you do want to try this you'll need someone with a vacuum to help.
A small skill saw with a diamond blade could work also but will still be dusty.
A low-tech version is to use a drywall hole cutter saw. It's cheap but leaves a jagged cut and is a lot more work.
Check the fit of the shower niche and make sure the size is ok and that it still lines up with your tile layout.
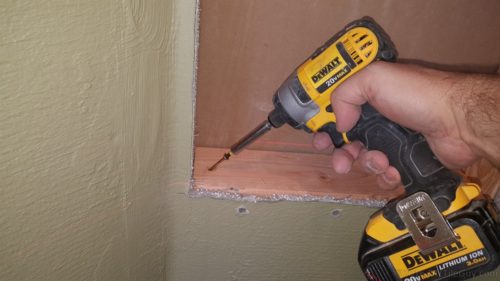
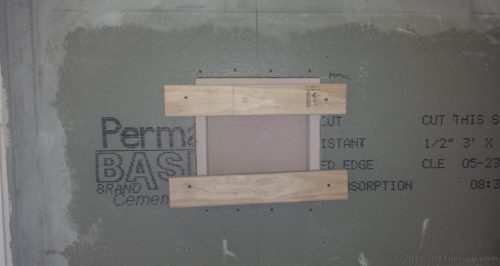
Add blocking
You're going to want to add two horizontal blocks above and below the foam recessed shampoo shelf. So measure the space in between and cut two 2×4's.
In theory, they should be about 14 1/2 inches but always measure to be sure. I typically try to make them snug so that they take a little hammering to get into place.
That way they will stay in place and not fall into the wall before they are screwed in.
I usually screw them through the backer board first. That way I can make sure they are in the right place and level. That will hold them initially.
Then screw them in at an angle to the framing to tie them in. To do this I use a pilot screw bit and then screw into the pilot hole. Do this on both sides.
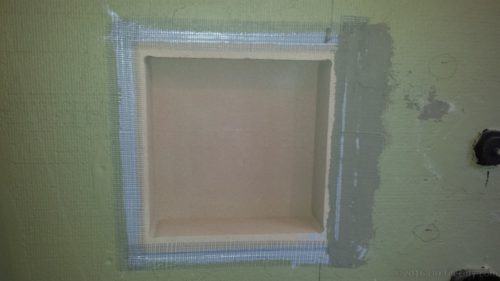
You now have the holes cut and framed in.
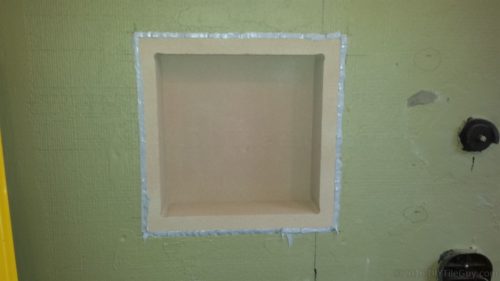
Install the recessed foam shower niche
You'll need some sort of sealant to glue the niche in place and seal around it. 100% silicone should work.
Also, a sealant like Kerdi fix or Wedi glue works well. The manufacturer of the niche will have a recommendation and it's usually a product that they make.
Be careful what sealant you use. Not all of them will work. Noble sealant 150 shouldn't be used with these as it can react with the foam.
I usually put 3 blobs of glue on the bottom 2×4 and also a couple more on each side. A lot of times I will glue the back as well. Then install the niche in the cutout.
Make sure to adjust it so that it hits your layout lines accordingly. You don't want it to be too high, too low, or crooked.
Then use two scrap pieces of wood and screw them in across the niche to hold it in place until the glue dries.
Sealing around the perimeter
Once the glue is dry I use the same sealant to glue around the niche on the wall. You are sealing the gap between the niche and the cement board. Don't smear the glue on the face of the wall.
Cover the seam with 2-inch mesh tape and thinset over it. You're ready to tile.
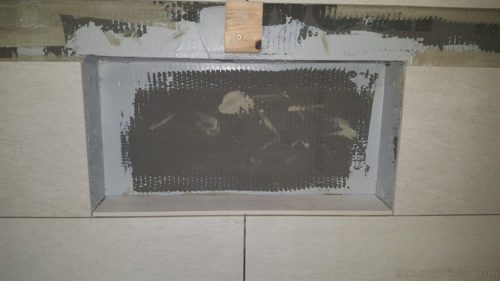
Installing Tile in your Recessed Shower Shelf
Continue on with the wall tiling. You may need to make a brace or two to support the tile that goes over the top of the niche
If the tile sticks past the opening of the niche this is ok. Come back and fill it with thinset so that it's flush and let it dry. It's better than the tile stick past the niche opening rather than come up short.
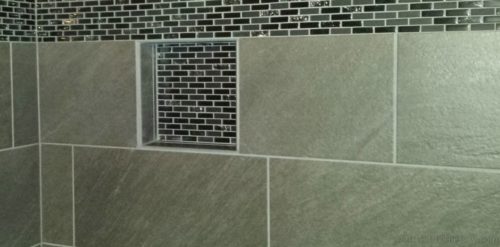
Here's the usual order of how I tile a recessed shampoo shelf:
Tile the sill (bottom) first. Let this dry.
Once it's dry you'll be able to stack tile off of the sill without it moving on you. Make sure the bottom has a slope to it.
I typically slope it 1/8 inch from back to front. This will allow water to run off but not be so steep of an angle that things will slide off.
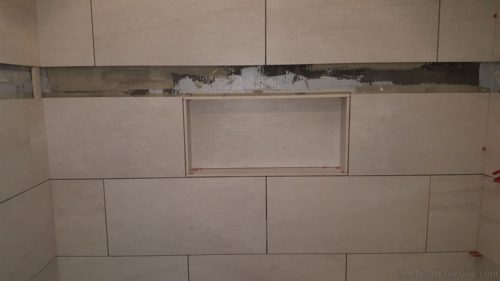
Typically I will look to tile the back of it next. Then fit the top and side pieces.
There are some exceptions to this though. One exception is if your bullnose trim is 2 3/4 inches wide then you're going to have a small sliver cut in the back.
If this is the case I will typically tile the top and sides and do the back last. This way you can install as big of a sliver cut as possible.
How to stick tile to the top of a niche
There's not much of a trick to sticking the tile to the top. The way to do it is to notch thinset on the back of the bullnose tile and stick it to the top.
Wiggle it back and forth a couple of times and the tile should suction itself in place.
If you are worried about it you can install the sides quickly and put tile wedges on top of the side pieces to hold it in place. But it will stay up with just thinset though.
Grout
Grout as you normally would. It's proper to silicone caulk all inside corners. Sometimes people will grout everything because they find it easier.
If this is how you end up doing it I promise not to call the tile police on you. :-)
Congratulations on building your recessed shampoo shelf!
Other posts in this recessed shampoo niche series:
- Planning and Design
- Modifying a prefab niche
- Building a custom niche
How To Install Shelf In Shower
Source: https://www.diytileguy.com/recessed-shampoo-shelf-pt2/
Posted by: raneyotion1985.blogspot.com
0 Response to "How To Install Shelf In Shower"
Post a Comment